| Zeppelin bend | |
|---|---|
 | |
| Names | Zeppelin bend, Rosendahl bend, Rosendahl's knot |
| Category | Bend |
| Related | Zeppelin loop, Hunter's bend, Ashley's bend, Alpine butterfly bend |
| Releasing | Non-jamming |
| Typical use | Joining two ropes of similar size |
| Instructions | [1] |
A zeppelin bend (also known as the Rosendahl Bend) is an end-to-end joining knot formed by two symmetrically interlinked overhand knots. It is stable, secure, and highly resistant to jamming. [1] It is also resistant to the effects of slack shaking and cyclic loading.
-
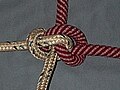 Front view
 -
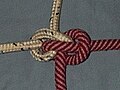 Back view
 -
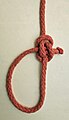
 Loosening / untying


History
The commonly accepted name for this knot stems from its alleged use on airships: a zeppelin being a rigid-bodied type of airship, and Charles Rosendahl being the US Navy officer who allegedly insisted it be used on airships under his command. [2] Dr Camplin asserts that a rolling hitch (#1735) is a more likely method used by ground handlers to join ropes. It is also likely that a 'toggle' was used to connect mooring lines with fixed eye splice terminations. Dr Camplin's report was published in issue #60 of 'Dirigible' in 2010. Historical records now point to Bob Thrun as the first to publish his discovery in 1966 – naming it simply 'An easily untied bend'. [3] Bob Thrun was well known in the caving community, and a remarkable innovator.

Despite being declared by many sources as a nearly ideal rope joining knot, [4] [5] it is not very well known: it is not included in the chapter covering 'bends' (end-to-end joining knots) in the original publication of The Ashley Book of Knots. [6] However, at illustration #582, Ashley identifies a 'lanyard knot' – which is remarkable because it is a blueprint for tying the Zeppelin bend. Budworth identifies #582 as a "blimp knot", because he recognized the geometric similarity with the Zeppelin bend. [7]
With the hindsight of the qualities of the zeppelin bend, a novel use of ABOK#582 is as an alternative to butterfly loop, to isolate a worn section of a long rope where the knot is tied such that the worn section is isolated in the middle of a Z folded central (double-loop-crossing) rope section. The knot will then look like a double slipped zeppelin bend with no ends sticking out.
Tying

Fundamentally, the zeppelin bend is formed from two superposed loops of opposite chirality. This is in contrast to the rigger's bend (AKA Hunter's bend, #1425A) which is formed from two inter-linked loops of the same chirality.
Chirality refers to the "handedness" of the loop, which can be either left (designated "S") or right (designated "Z"). The chirality of a loop cannot be changed by flipping or turning it over – in the same way, a left shoe cannot be transformed into a right shoe by flipping or turning it over (it is always a left shoe).
The zeppelin bend is difficult to tie while ropes are under tension (which is further obvious evidence that it wasn't used with mooring lines during ground handling of airships). In fact, with any 'end-to-end joining knot' (i.e. bend), existing tension in the ropes makes the tying process extremely difficult (if not impossible). The zeppelin is therefore tied with two loose ends (i.e. no existing tension) ending with a simple knot on each, but woven to each other in a pattern specific to zeppelin. Butterfly bend, Hunter's bend, and Ashley's bend also weave one simple knot on either end but use their own different patterns.
-
 Ends held together, inner main part forward
 -
 Outside end bent out and over both ropes
 -
 Outside end under both ropes and up through own loop
 -
 Inner end under inner main part, and through loops along outside end
 -
 Tighten by pulling opposite ends and main parts.


- Form a loop in each of the ends of rope (one loop must be "S" and the other must be "Z" chirality)
- Superpose (overlay) one loop over the other, orienting each loop so that both working ends face outwards/away from the central overlap.
- Feed each working end though the central overlap of the two loops, ensuring that each working end goes in opposite directions.
- Dress and set the knot by sequentially pulling on all four rope segments.
- To untie, loosen the collars that form around each Standing Part (SPart).

Another method of remembering this knot is to visualize a "69". To tie the knot with this method, follow the steps below:
- Make a "6" with one line (rope) end. It is important that the working end (the free, short end) winds up on top of the standing end for the "6".
- Make a "9" with the other line end. Make sure that the working end (the free, short end) winds up on the bottom of the standing end
- While keeping the 6 and the 9 intact, place the "6" over the "9", with the holes of each number lining up, making absolutely sure the working ends are on opposite sides of the holes, and both working ends are outside, not in between the standing ends.
- wrap the "tail" of the "6" first down, around both lines/hole edges, and up through the middle (circle) part of your "69".
- wrap the "tail" part of the "9" up, around both lines/hole edges, and down through the middle (circle) part of your "69", it should pass along to the other working end in the opposite direction.
- Pull each standing end while ensuring that the working ends are not pulled back out from the "69" holes to tighten. Pull each working end to tighten even more.
Variants
-
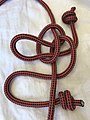
 Simplest and therefore the slimmest version of Zeppelin bend
 -
 Zeppelin bend where the ends are secured with a stopper knot each
 -
 Zeppelin bend tied with bights creating two fixed loops protruding from the knot core
 -
 Zeppelin bend on bight with three very reliable fixed loops at the knot
 -
 Double slipped zeppelin bend with stopper knots at the ends
 -
 Double slipped zeppelin bend with slips locked using the knotted ends
 -
 Zeppelin knot—the working ends on the bend version create a bight/loop on the knot version
 -


Corresponding eye (loop) knots
Every end-to-end joining knot, or 'bend', has four corresponding eye knots.
The usual method of creating an eye knot from a bend is by linking a tail with a Standing Part (SPart). Eye knots formed by linking of the two tails or the two SParts are usually of less utility due to the loading profile thus created.
The Zeppelin loop is quite useful and is also jam resistant, being formed by linking a tail to an SPart. An example of a Zeppelin loop is found at this website: https://knots.neocities.org/zeppelinloop.html
Slipped
Having on both ends, an elbow of the end rather than the end itself, cross the knot center, gives a single or double slipped version. It is still easier to untie by pulling the opposing bridges away from each other rather than by pulling the slipped end(s). The slipped Zeppelin bend can also be locked by pushing ends respectively through the eye of its own slip on the opposite side.
-
 Tying the slipped version: starting with a simple slip knot on one of the standing parts
 -
 Weaving in the start of a symmetrical simple slip knot with the end of the other standing part
 -
 finalizing the symmetrical simple slip knot with a bight at the end of the other standing part
 -
Tightening the double slipped zeppelin bend, by pulling the standing parts and the slips
-
 locking the double slipped zeppelin bend, each slip locked with its own end
 -
 Tightening the locked slips of the double slipped zeppelin bend
 -
Double slipped zeppelin bend with slips locked using the knotted ends pulled tight


Tied with bights
If instead of two ends, one forms two bights of the same rope, then three reliable loops are created; a loop at each of the two bights, and a third formed by the rope section connecting the two bights. These versions also have the same advantage with less curvature nearest the main ropes, thus having a higher break strength and being as easy to untie. This is also a way to shorten the rope, and/or to isolate up to three weak rope sections near each other.
See also
References
- ^ Gommers, Mark (2019). "Analysis of offset joining knots". Professional Association of Climbing Instructors.
- ^ Lee Paine; Bob Paine (Jan–Feb 1980). "The Forgotten Zeppelin Knot". Mother Earth News. Retrieved 2013-08-08.
- ^ Thrun, Robert (1966). "An easily untied bend". Potomac Caver newsletter. 9 (7).
- ^ Brion Toss (1998). The Complete Rigger's Apprentice. Camden: International Marine. pp. 69–70.
- ^ "Zeppelin Bend". Notable Knot Index. Retrieved 2010-11-04.
- ^ The chapter covering bend knots in The Ashley Book of Knots does not include this knot. See pages 257–274.
- ^ Budworth, Geoffrey (1998). The complete book of decorative knots : lanyard knots, button knots, globe knots, Turk's heads, mats, hitching, chains, plaits. Guilford, Connecticut: Lyons Press. p. 34. ISBN 1558217916.